Saturday, April 7, 2012

Home-made envelopes

This was originally posted one year ago, but I just noticed that I posted it to the wrong site! So I am re-posting now. This little craft has definitely come in handy and I've loved having it hanging on my wall.


.................


Lately, money has been on my mind a fair bit. So many goals, so many things to save for, so hard to keep track. Digital programs don't work as well for a mind like mine, because I forget to keep tabs on what's happening. No, for me, handcrafted and noted is best.


In a recent issue of "Living" magazine, I saw a fold-out envelope project designed for Valentines. This got me thinking that envelopes on my wall might be a good, tangible means of really hurling the ball into action on my cash goals.


Martha came in handy for this project again with an envelope template I downloaded from her website,

and manipulated in Photoshop to be the size that best suited my project.


The template was printed onto a brown coloured cardstock and cut out by hand. Using an exacto knife (couldn't find my bone scoring tool), I gently scored the envelope fold lines, then folded and glued them into individual envelopes.


I am a paper enthusiast, if such a thing can exist, and have a nice collection of Japanese paper bits. Having made 10 envelopes, I picked out 10 pieces of decorative paper that I thought would be neat together, and cut them to the same length as the envelopes, and a 2" width. These pieces will be acting as liners, and give each envelope a bit of pop, and distinguish them from each other.


After gluing the Japanese paper into the envelopes, I laid my finished pieces out on the table and put them in an order I liked, leaving myself with two groups. Using a healthy amount of glue (just using a glue stick), each envelope was glued to the remaining open flap of the one below.


Since my coins are saved in jars, one nail is enough to hold up each set of five money-collecting pockets. Now I have something nice to hang on my wall, which will bring me all kinds of pleasure when I fill them with bills. Hooray!

Monday, November 7, 2011

Christmas Ornaments 2011


I can't believe it's already time to do this,
but so it is. Another fall spent working
indoors until Wee Bean ornaments are
ready to be taken home. So without further
ado, here are the designs available.


SANTA ~ $25 ANGEL ~ $20


SNOWMEN ~ $20 TREE ~ $20


SHEEP ~ $20 COAL ~ $20


NIGHTMAN ~ $20


There will be a few ways to get ahold of my tiny creations this year. One could order by firing an email to weebeandesign@gmail.com, or they will be available at the merch table for select Good Lovelies concerts. Please send me an email if you plan to purchase at a concert to ensure I will be bringing stock.

Ornaments are only available in Canada, due to border restrictions.
Shipping costs vary, I will confirm all charges before billing.
Payment can be made by PayPal or Email Money Transfer.

** Order will only be shipped on November 14th, November 28th, and December 12th. This is due to the fact that I will be on the road with the Good Lovelies. Please email to see if exceptions are possible.

Sunday, November 6, 2011

One Little Sheep Had Four Legs


I cannot believe it has been one complete year since I last wrote. So much has happened in that time though, that I suppose I'm not terribly surprised. So here I find myself again, readying for the Christmas season, with boxes of my ornaments nearing completion.

Last year I posted about a new design, the sheep. He has changed a little this year, and one particularly fat specimen would not fit into an ornament case. I handed him over to my fella, Rob, and he now holds a place on my office armoire. Complete with four legs, I confess, I love him very much. Perhaps I will make you some friends soon, little sheepy.

Below is a photo of the ornaments in progress. There is one black sheep in this year's collection, but we've grown rather close this month, so he may stay with me for a little while yet. A little shy of their own wool, or perhaps finding it itchy, these are sheep dressed in alpaca's clothing. Truly. Thanks to The Purple Purl on Queen St. E. in Toronto, for dressing 2011's sheep! This is also a great little spot to have a coffee and do some knitting incidentally, and I do recommend checking it out if you're in the city.


Next up, a post about all six ornaments. And by next, I mean in about an hour. So much catching up to do!


Sunday, November 21, 2010

Ornament Construction

It has been many months since my last post, but there is no better time than this to get started again. In 2005 I began crafting ornaments, calling the project TreeBean. I have since changed things to Wee Bean since discovering the original name is in use, but that is beside the point.

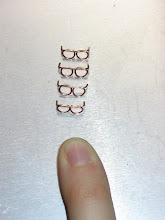
Given a busy schedule, production is behind, but I am determined to complete a few choice ornaments for this season. Today began constructive surgery on Santa's face. Tomorrow these will be completed with beards, glasses and hats, but for now, the face is an important step. I have already prepared my watchmaker's cases (Lee Valley Tools) with felt circles and a few layers of mustard seed, so the tools I need for today include tweezers, an accordion glue bottle with a fairly narrow needle, and lots of orange lentils. One by one, starting at the centre, the lentils are placed. It is important to picture two as eyes bumps and two as cheek bumps, minimizing gaps so that the face doesn't look too bizarre. My photo here is a little blurry (must locate my tripod), but you get the gist. Tiny glue dot for tiny lentil. The final step is the addition of a nose. For this, I use a knife to carefully cut a lentil in half, and it gets glued to the centre, slightly overlapping the eye bumps.

Eight lentils x 9 ornaments later, voila! The many faces of santa!


This is a very brief post, I know, but hopefully this gives people an idea of how it all happens. I have two "new" ornaments to release to the public this year, though in very small quantity, and they are pictured below.

The less seasonal sheep in the grass.


A lump of coal set on a round, beveled mirror.
All the coal was found on my family's property in Cobourg.
Very classy for a black & silver themed tree.

I will post again when the ornaments are complete. Until then, enjoy the beginnings of the holiday season!

Thursday, February 11, 2010

Daisy Window

This project began about a month ago. I celebrated my brithday on the 2nd and 3rd of January (though this is not my actual birthday), and upon returning home to Toronto, I brought with me a beautiful bouquet of white daisies from my parents. They know me well, white field daisies are my favourite flower.

When the first blooms began to wilt, my craft encyclopedia was lying open on the table next to them. There happens to be a section on pressing flowers, and so the decision was made. I would preserve the daisies from my thirtieth birthday in some fashion.

The drying process was fairly simple, though I forgot to take photographs - sorry about that. I clipped the blooms with stems initially, but that proved difficult for drying (the petals were coming off when flattened) so I ended up removing most. Without most materials listed in the encyclopedia, I improvised. In the event that one does not own an actual flower press, the recommended layers are corrugated cardboard, blotting paper and news print. Cardboard and newsprint I happened to have, but blotting paper I did not. I used instead some scraps of what was likely Arches paper left over from my university printmaking classes. Don't worry printmakers, it wasn't worthy of printing anymore. So like a layer cake, I built a stack of cardboard, arches, newsprint, daisies, newsprint, arches, cardboard... repeat. I stacked this on one of the lower shelves of a bookshelf in my living room, weighed down by a heavy dictionary and a hardcover copy of Shakespeare's complete works (much to the frustration of the cat).

About one week later, the flowers were flat, dry and ready for... something.


Weeks later, or more sepcifically, yesterday, I decided. After opening up the encyclopedia once more, I selected a project for which I had all the materials. In hind sight, I wish I had chosen something a little more lasting like the glass coasters, but what's done is done and it looks lovely.

There is a door from my bedroom out to the yard, and it has never had a blind of any sort. Though no problems have arisen as of yet, there is another door into the house right next to it which leads to the basement - that door is used by my landlord. So, it's time to cover up the bedroom window.

Enter waxed paper, more newsprint, an iron, dried daisies, needle and thread.

Step 1: Cut the waxed paper into rectangular shapes to fit the window. Mine had nine panes, 5.5" x 11". The daisies are being sealed into the waxed paper, therefore I cut out 18 rectangles, using a paper cutter to get nice straight edges.

Step 2: Lay some waxed paper out on your ironing board. Place one rectangle down at a time, space out your daisies (or other) and lay the second sheet on top. Be certain that they are as close to perfectly square on top of one another when you place another sheet of newsprint on top. Also make certain that your waxed paper is waxy side in, so that the two sheets melt together, and you aren't getting wax everywhere else. Now, all that is required is a quick ironing at low temperature (I used the silk setting). No need for a lot of pressure, just enough to seal the edges and any bubbles that may be left behind. Repeat this step for all nine panes.


Step 3: This is the tricky part, and it requires some patience. If you're not a very patient person, perhaps do only a few panes per day. With needle and thread, you need to stitch the panes of waxed paper together. If there is no wooden frame on your window, spacing is not an issue. If there is, like my window, you will want to measure distances.


Trim a piece of thread about 4" long so it's easy to work with. Tie a knot at one end (I like a double knot so that I know it won't slip through the hole once hung), and thread the needle. Place 2 of your panes on top of one another, face in, and stick the needle through the corner. Tie another knot at whatever distance from the edge of the paper you need, to allow the proper hanging space. I left 1" from the edge of my sheet of waxed paper for the gap between panes on my door's window.

Once that is complete, thread a few loops into each of the top panes for hanging. That's it that's all! You now have an opaque botanical window covering, that will still let some sunlight in.


My plan for later on, once this window covering is no longer needed, will be to select my favourite daisy, trim out it's waxed paper area, and make a frame for it. Either something flat to go into a scrap book, or big enough to go into a frame. Either way, this project still has life.

Wednesday, February 10, 2010

Season of Love

Once a year, this holiday comes around, and though I typically don't do a whole lot to celebrate, I usually do cards. Instead of buying though, I love handmade cards if manageable. I pulled out a few materials I had lying around, and went to work.

First of all, I used some blank cards I bought from a stationery store a few years ago. They were pre-cut with a window so that one could insert a photograph. Instead, I cut out a few pieces of off-white paper to use as a matting.

A few years ago, my brother gave me the most wonderful gift. Among the items were beautiful pieces of Japanese paper and a hole punch shaped like a girl. Using a strip of the Japanese paper, I cut half-heart shapes and punched out a few girls (sounds violent doesn't it?).

I then glued the cutouts to the offwhite paper. This was then taped into the card and voila. Incredibly simple, but they look lovely. On the light coloured card, I added a red border so that the cutouts didn't appear to be floating around the page so much.

So here they are:


HAPPY VALENTINE'S DAY.


Tuesday, January 19, 2010

Basil, Spinach and Goats Cheese Ravioli

My favourite venture so far, because the end result is delicious, was Basil, Spinach and Goats Cheese Ravioli.

Just before Christmas, I found a pasta machine on sale. I have wanted one of these for years now, because there is nothing beats fresh pasta. The egg pasta recipe I used was from Mark Bittman's How To Cook Everything. I did a whole wheat pasta with chopped basil mixed in. The stuffing included cooked spinach, goats cheese, parmesean cheese, parsley and garlic.


Yummy. I did a pretty poor job of folding the raviolis until my guy joined in the fun. Who knew he was a master ravioli sealer?!


Once they were all ready, it took a whole minute to cook in some boiling water... the other beauty of fresh pasta - it cooks FAST! The preparation took a few hours my first time through though, but when you're working on it with a partner, it's pretty fun.

Final result, delicious pasta topped with a tomato sauce of your choice. Bon apetit!